| |
 |
|
การสอดไส้และบากลายกระหนก |
| บทเรียนที่ ๖ / Lesson 6 |
|
Making the Insides and Making Edgings on Kranok Design |
เมื่อคุณสามารถฝึกวาด กระหนกตัวเดียวแบบเปลือยๆ จากบทเรียนที่ ๕ ได้จนชำนาญแล้ว บทเรียนนี้จะให้คุณ ได้สอดไส้ตัวกระหนก และบากลายในลักษณะต่างๆ ซึ่งมีความแตกต่างกัน (โดยใช้ทั้งการบากลายเข้า และบากลายออก ในกระหนกตัวเดียวกัน) และใส่กาบใบ ให้กับตัวกระหนกด้วย ลักษณะกระหนกเช่นนี้ บางคราวก็เรียกกันว่า กระหนกใบเทศ เพราะมีรูปร่างเหมือนกับใบเทศ หรือใบของต้นพุดตาน (hibiscus) ซึ่งเป็นไม้ตระกูลชบา ดอกใหญ่ มีกลีบดอกซ้อนสวยงามมาก
When you succeed in drawing Kranok Design without details from Lesson 5, you will learn how to add the insides in the Kranok Design in this lesson. Moreover, you will be taught how to make edgings on them (both edging the lines in and out) and add the small "leave" at the base of the design. Sometimes we call this kind of design as " Kranok Bai Thet " because it looks like the hibiscus' leaves. The hibiscus' flowers consist of very beautiful overlapped petals.
 |
|
ขั้นตอนการสอดไส้และบากลายกระหนก
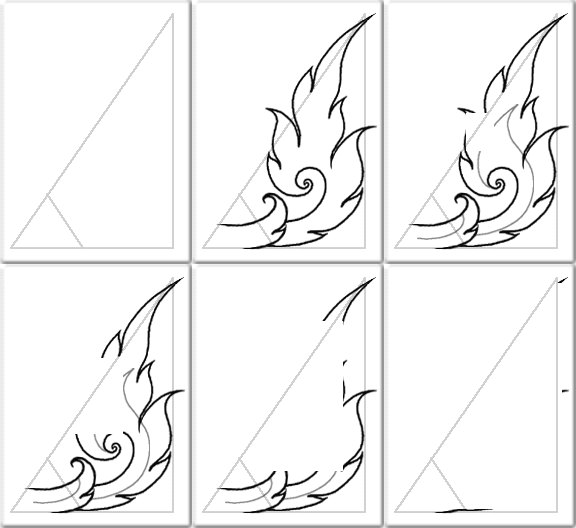
๑. การเขียนโครงสามเหลี่ยมมุมฉาก ใช้ขนาดเดียวกับบทเรียนที่ ๕
๒. เริ่มจากการวาดกาบใบเสียก่อน (คือส่วนที่เป็นสามเหลี่ยมด้านเท่า ในบทเรียนที่ ๕) โดยเขียนให้โคัง และตวัดยอดเหมือนกับยอดโค้งของใบไม้อ่อน และบากลายที่กึ่งกลางกาบ ดังภาพตัวอย่าง
๓. สังเกตดูช่วงของการบากลายเข้า และออกได้จากภาพตัวอย่างนะครับ เริ่มลากเส้นจากโคน ตัวกระหนกและลากยาว จนถึงยอดลาย และตวัดกลับ แต่ระหว่างทางที่ลากเส้นนั้น จะมีการบากลายอยู่ตลอด สังเกตดูได้จากภาพตัวอย่าง |
|
Instructions in making the insides and the cuts on the design
1. Draw a right-angled triangle, the same size as that indicated in lesson 5.
2. Begin with an additional "leaf" (one in the equilateral triangle mentioned in Lesson 5). Draw it curvely and make the top curl like the curve of the young leaf which is not fully open. Then make an edging in the middle of the design (see example).
3. You can notice when to edge in and out from the example. Draw the line from the base and draw it until you reach the top of the design and draw the line downward. Then will be line edgings along such line (see example). |
| |
|
|
|
|
 |
|
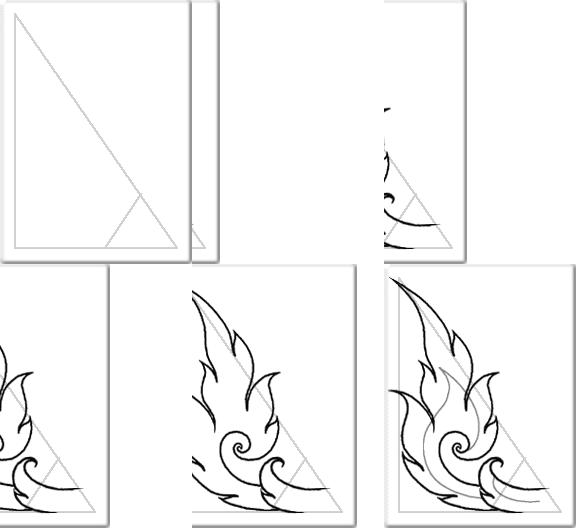
๔. เมื่อได้ตัวกระหนกที่สมบูรณ์แล้ว ขั้นต่อมาก็คือการสอดไส้ลาย ให้วาดลายสอดไส้ ทั้งตัวกระหนก และกาบใบ ลักษณะเส้นจะอ่อนเบากว่า เส้นรูปของตัวกระหนกที่เข้มกว่า
๕. เสร็จสมบูรณ์
๖. การวาดตัวกระหนกพลิกกลับ ด้านซ้ายมือนี้ มีวิธีการเช่นเดียวกับ การวาดด้านขวามือ |
|
4. When the Kranok Design is complete, the next step is to make the insides, both within the Kranok Design and the additional leaf. The lines of the insides are lighter than those of the outsides.
5. The design is complete.
6. The approaches in drawing the design the design from the reverse side are the same as those drawn from the right. |
ข้อควรสังเกต
๑. การวาดตัวกระหนกขั้นนี้ ก็ยากขึ้นมาอีกนิดนะครับ แต่ข้อผิดพลาดที่พบได้เสมอ ก็คือ ลืมโครงตัวกระหนกเปลือยๆ จากบทเรียนที่ ๕ เขียนเอาตามแบบกันเลย ผลที่ได้ก็คือเบี้ยวซิครับ ผมขอแนะนำว่า คุณควรลากเส้นโครงเบาๆ ของตัวกระหนกจากบทเรียนที่ ๕ เสียก่อน แล้วจึงลากเส้นตาม ให้สังเกตจังหวะในการบากลาย ได้จากภาพตัวอย่างนะครับ
๒. การใช้การบากลายนั้น คุณจะสังเกตเห็นว่า ผมบากลายค่อนข้างลึก จนเข้าไปทับกับเส้นลายสอดไส้ (สีเทาๆ นั่นแหละครับ) อันนี้คงต้องบอกว่า เป็นลักษณะส่วนตัวของผม คุณอาจจะวาดให้ลายบาก ตื้นกว่านี้สักนิด เพื่อที่จะได้ไม่ทับ กับเส้นลายสอดไส้นะครับ
๓. ผมขอแนะนำเหมือนเดิมนะครับ ว่าคุณควรหัดเขียนอย่างน้อยๆ ก็ ๑๐๐ ตัวขึ้นไป ทั้งด้านซ้ายและขวา
๔. มีข้อควรสังเกตสิ่งหนึ่ง จากบทเรียนนี้คือ กาบใบ และตัวกระหนก จะสอดรับกันพอดี เหมือนเราจับตัวกระหนก สอดเข้าไปในกาบใบฉะนั้น หากว่าคุณเขียนแล้วไม่ได้ความรู้สึกอย่างนั้น ก็ขอให้เขียนใหม่นะครับ ลองจินตนาการดูนะครับ ว่าเหมือนกับการสวมฐานรองดอก (ในที่นี้คือกาบใบ) เข้าพอดีกับกลุ่มกลีบของดอกไม้ (คือตัวกระหนก) ได้อย่างเหมาะเจาะ
๕. ตัวกระหนกที่บากลาย จนสมบูรณ์แล้ว จะมีลักษณะเหมือนกับใบไม้ หรือกลีบดอกไม้มาก เพราะฉะนั้นถ้าคุณวาด ออกมาแล้ว ตัวกระหนกที่ได้ ดูแห้งเหี่ยวไร้ชีวิตชีวาแล้วละก็ คุณควรฝึกหัดเขียนใหม่นะครับ เพราะตัวกระหนกที่ดี ต้องมีลักษณะอวบอิ่ม สดชื่น เหมือนไม้ที่เพิ่งพลิใบอ่อน ม้วนกลีบ และดูเหมือนกับมีชีวิต สามารถเคลื่อนตัว พริ้วไหวได้
Remarks
1. Drawing this kind of design is more difficult than drawing the Kranok Design without details. The mistake that often occurs is that the beginner often forget the outline of Kranok Design without details from Lesson 5. Thus, the design in this lesson may be distorted. I suggest that you draw an outline of Kranok Design from Lesson 5 lightly. Then draw a thicken line along the outline. Please note the range of the line edgings from the example.
2. You can note that I make so deep edgings that it overlaps the insides (the gray lines). This is my unique style. You may make less deep edgings in order that they will not overlap the insides.
3. I would like to give some advice as in the previous lessons - - practice drawing the design more than 100 times from both sides.
4. You should notice that the additional leaf and the Kranok Design must be exactly fitted together as if we put Kranok Design into the additional leaf. If your drawing is not similar to what I have explained, please draw it again. Try to imagine that it is like we place the flower (Kranok) on the additional leaf.
5. The Kranok Design which has already been edged will look very much like a leaf or a petal. Therefore, if the Kranok Design drawn by you looks lifeless, you should practice more. The good Kranok Design must be lively and fresh like young rolled up leaf which is curly, lively and delicate.


|
|
|

