| |
 |
|
����ʹ�����кҡ��¡��˹���� |
| �����¹��� � / Lesson 9 |
|
Drawing the Insides and Making Edgings on Kranok Plail Design |
����ͤس����ö�֡�Ҵ���˹���� ���ӹҭ������ ���令�͡���ʹ�����кҡ��� ���Ѻ��ǡ��˹���� ��觡��˹������ǹ�˭� ������ºҡ����л���ҳ �-� ���˹� (������ö��������Ŵ ���˹觢ͧ��ºҡ���ա �������������� ���͵����Ҵ �ͧ��ǡ��˹�) ������ա�úҡ������� ��ǡ��˹��д���§���ҡ��� ���������ѧ������������ �ب�����ԧ ���ѧ���ͷ�������ҧ���ԧ
When you can draw Kranok Plail Design very well, the next step is to draw the insides and making edgings on Kranok Plail. Most of Kranok Plail Design require 6 - 7 edging on them (you can increase or decrease the edgings accordingly). After Kranok Plail Design is edged, it will look more beautiful and movable like the flame and is in accordance with its name (as explained earlier "plail" means a flame).
 |
|
��鹵����ʹ�����кҡ������˹����
�. ����Ҵ��������������ҡ ����բ�Ҵ��С���觾�鹷�� �����ǡѺ�����¹��� � ��� �
�. �Ҵ��������ǹ�ͧ�Һ� (�Һ���� �������ǹ�ͧ��ç͡�͡ �ͧ�����¡��˹����) 㹾�鹷���������������� ���������� ������Ѻ�ҡ�����ҵ���ٻ
�. �Ҵ����駨ҡ⤹��� �ҡ��Ѵ����ǹ��Ǣͧ��ǡ��˹� ����ҡ��������������� (��Ҥس�ѧ���ӹҭ �����ҧ�ç�ͧ���˹���� ���������� ��) ���Ǩ֧�кѴ��鹢�� ��кҡ����������͡ ����ѧ��Тͧ������ �ҡ���������������������� ���֧�ʹ��� ����ҡ�����������¡�Ѻ ������Ѻ�ҡ��µ���Ҿ �¾������ѧࡵ��ȷҧ�ͧ��� �����ҧ��úҡ��� �������㹷ç�ͧ���˹���� ����кѴ�ʹ���ҧ��Ŵ��� |
|
Instructions in making the insides and the edgings in Kranok Plail Design
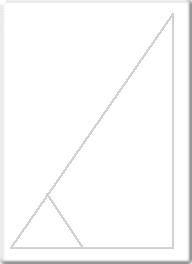
1. Draw a right-angled triangle with the size and space division as stated in Lesson 5 - 6
2. Draw a curved line within the additional leaf (this part is where Kranok Plail Design comes out) in the small triangle on the left and edge in the design (see example).
3. Draw the curved line from the base of the design. Draw the line continually (if you are not experienced enough, draw the outline by the pencil lightly first), then whip the line up and making the edgings, both in and out, according to the range of the design. Go on making the edgings, in order that it looks like a flame, until you reach the top of the design. |
| |
|
|
|
|
 |
|
�. ��������ٻ�ç ���˹���� ����ʹ�����кҡ��� ���º�������� �֧�ʹ�����·���ǡ��˹� ��СҺ� ������鹷�������Ҵѧ�Ҿ
�. �Ҵ���˹���� �ʹ�����кҡ��� ����ԡ��Ѻ �ҧ��ҹ���� �����ǡѺ�����¹����ҹ�� �Ըա���Ҵ �������ǡѺ����Ҵ��ҹ��� |
|
Then pull the line downward and making edgings along the design (see example). Please notice the direction of the line during making edgings. The line must be in the shape of Kranok Plail Design with Hang Lai Design at the top.
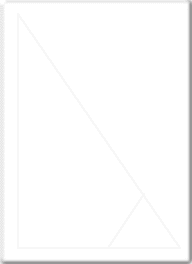
4. Now we have finished making the Insides and the edgings for the Kranok Plail Design. The next step is to do the same with the Kranok Design and the additional leaf. However, the lines used in there parts must be lighter (see example).
5. Draw the Kranok Plail Design, make the insides and the edgings from the reverse side ad indicated in the previous lesson. The instructions are the same as that drawn from the right.
|
��ͤ���ѧࡵ
�. �س���������������ҧ��úҡ��� ����ʹ��� ���˹���� �������Ҵ���������ç�ͧ����ҧ��� ���¹Ф�Ѻ ���ж�Ҥس����ç��ҧ��� �������� �Ѻ�ͧ��ǡ��˹������ �繵�ͧ�ٴ������������Ǥ�Ѻ
�. ����ѧ���ӹҭ�� ���ͧ���ǹ�����¹��˹�ҹ�� �����鹵 �ա���駹Ф�Ѻ �����������������˹ ��������稡������ѵ� �ͧ�س�ѹ��� ��Ф�Ѻ
�. �������Ѻ �֡�����ҧ���� ��� ��� ��駴�ҹ������Т�� ��ж���êӹҭ������ ��ҡ��ԡ�ŧ���¡�� ��¹����ǡ��˹� ��Ǥ���ŧ��ҧ �����Դ��ԡҹФ�Ѻ �Ѻ�ͧ�س����㹧ҹ��ԧ��
Remarks
1. Please don't forget that during making edgings and the insides, try to draw it in the outline of Hang Lai Design. This is because if you forget the outline, the Kranok Design will be distorted.
2. If you are not very skilful, please review the previous lessons. If you try heard, you will be successful.
3. As advised before, draw more than 100 designs from both sides. If you are experienced enough, you may draw the up side down design - - as you like it. I guarantee that you will have a chance to use it when you became a professional.
|
|

